
Spring WebSockets: Bidirectional Communication For Clients And Servers
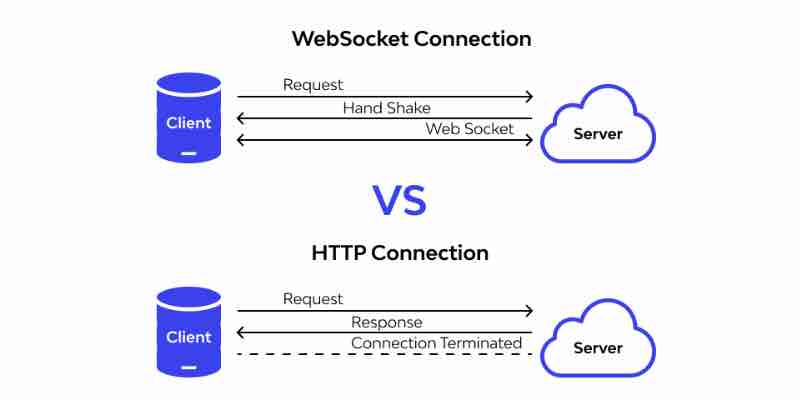
Spring WebSockets is a module in the Spring Framework that allows for real-time, bidirectional communication between a client and server in a web application. It uses the WebSocket protocol, which is a standardized protocol for real-time communication over the web. With Spring WebSockets, developers can create web applications that can push updates and data to the client in real-time, without the need for continuous polling or page refreshing.
Where can Spring WebSockets be used?
Spring WebSockets can be used in any web application where real-time communication between the client and server is required. This includes applications such as chat applications, collaborative document editing tools, real-time gaming, and financial trading platforms. In addition, Spring WebSockets can be used to enhance user experience in applications that require frequent updates, such as stock tickers, news feeds, and social media applications.
Is Spring WebSockets scalable for servers with huge number of clients?
Yes, Websockets are scalable for servers with very high numbers of clients. In fact, websockets were designed specifically to handle large numbers of simultaneous connections, making them an ideal solution for real-time applications that require bidirectional communication between the client and server.
One of the key benefits of websockets is that they use a persistent connection between the client and server, meaning that data can be transmitted in real-time without the need for repeated HTTP requests. This reduces the load on the server and improves performance, making it possible to handle large numbers of connections simultaneously.
However, it’s important to note that the scalability of websockets can be impacted by a number of factors, including the available server resources and the complexity of the application being built. In order to ensure that a websocket-based application can handle high volumes of traffic, it may be necessary to implement load balancing and other techniques to distribute the load across multiple servers.
Additionally, it’s important to optimize the application code to minimize the amount of data being transmitted over the websocket connection and to reduce the processing time required by the server. By following best practices for websocket development and ensuring that the application is properly optimized, it’s possible to build scalable and robust real-time applications using websockets.
How to use Spring WebSockets
To get started with Spring WebSockets, we first need to create a new Spring Boot project. Open your preferred IDE and create a new Spring Boot project using the Spring Initializr. Add the “WebSocket” dependency to your project by including the following code snippet in your pom.xml file:
|
1 2 3 4 5 6 7 |
<dependency> <groupId>org.springframework.boot</groupId> <artifactId>spring-boot-starter-websocket</artifactId> </dependency> |
Next, create a new class called “WebSocketConfig” and add the following code:
|
1 2 3 4 5 6 7 8 9 10 11 12 13 14 15 16 17 18 |
@Configuration @EnableWebSocketMessageBroker public class WebSocketConfig implements WebSocketMessageBrokerConfigurer { @Override public void configureMessageBroker(MessageBrokerRegistry config) { config.enableSimpleBroker("/topic"); config.setApplicationDestinationPrefixes("/app"); } @Override public void registerStompEndpoints(StompEndpointRegistry registry) { registry.addEndpoint("/websocket").withSockJS(); } } |
In this class, we configure the WebSocket message broker and endpoint. The message broker is responsible for routing messages between the client and server. In this example, we enable a simple message broker that will route messages to destinations that start with “/topic“. We also configure the application destination prefix to “/app“, which is used to differentiate between application-level messages and broker-level messages.
The registerStompEndpoints() method registers the WebSocket endpoint, which clients will use to connect to the server. In this example, we define the endpoint as “/websocket” and enable the use of the SockJS fallback option. The SockJS fallback option allows clients to connect to the WebSocket endpoint even if WebSocket support is not available in the client’s browser.
Now, let’s create a simple controller that will handle incoming messages from the client. Create a new class called “GreetingController” and add the following code:
|
1 2 3 4 5 6 7 8 9 10 11 12 13 |
@Controller public class GreetingController { @MessageMapping("/hello") @SendTo("/topic/greetings") public Greeting greeting(HelloMessage message) throws Exception { Thread.sleep(1000); // simulated delay return new Greeting("Hello, " + message.getName() + "!"); } } |
In this class, we define a new method that will handle incoming messages from the client. The @MessageMapping("/hello") annotation indicates that this method will handle messages sent to the “/app/hello” destination. The @SendTo("/topic/greetings") annotation indicates that the response from this method will
be sent to the “/topic/greetings” destination, which was configured in the WebSocketConfig class.
The method takes a HelloMessage object as input, which represents the incoming message from the client. The method then processes the message, in this case adding the client’s name to a greeting, and returns a Greeting object as the response.
Now that we have our WebSocket endpoint and message handler defined, let’s create a simple HTML page that will allow us to connect to the server and send messages. Create a new file called “index.html” in the resources/static folder and add the following code:
|
1 2 3 4 5 6 7 8 9 10 11 12 13 14 15 16 17 18 19 20 21 22 23 24 25 26 27 28 29 30 31 32 33 34 35 36 37 38 39 40 41 42 43 44 45 46 47 48 49 50 51 52 53 |
<!DOCTYPE html> <html> <head> <title>Spring WebSockets Example</title> <script src="/webjars/sockjs-client/sockjs.min.js"></script> <script src="/webjars/stomp-websocket/stomp.min.js"></script> <script> var stompClient = null; function connect() { var socket = new SockJS('/websocket'); stompClient = Stomp.over(socket); stompClient.connect({}, function(frame) { console.log('Connected: ' + frame); stompClient.subscribe('/topic/greetings', function(greeting) { showGreeting(JSON.parse(greeting.body).content); }); }); } function disconnect() { if (stompClient != null) { stompClient.disconnect(); } console.log("Disconnected"); } function sendName() { var name = document.getElementById('name').value; stompClient.send("/app/hello", {}, JSON.stringify({'name': name})); } function showGreeting(message) { var p = document.createElement('p'); p.appendChild(document.createTextNode(message)); document.getElementById('greetings').appendChild(p); } </script> </head> <body> <div> <label for="name">Name:</label> <input type="text" id="name"/> <button onclick="sendName()">Send</button> <button onclick="connect()">Connect</button> <button onclick="disconnect()">Disconnect</button> </div> <div id="greetings"></div> </body> </html> |
This HTML page includes the SockJS and STOMP libraries, which are used to create a WebSocket connection with the server. The connect() function creates a new SockJS connection to the server and establishes a STOMP connection over that WebSocket. The disconnect() function closes the connection. The sendName() function sends a message to the server using the “/app/hello” destination, and the showGreeting() function displays the response from the server.
To test our application, run the Spring Boot project and open a web browser to http://localhost:8080/. Enter your name in the text field and click the “Send” button. You should see a greeting appear in the “Greetings” section of the page.
Conclusion
Spring WebSockets is a powerful tool for building real-time, bidirectional communication in web applications. With Spring WebSockets, developers can create applications that push updates and data to the client in real-time, improving the user experience and reducing the load on the server. In this tutorial, we walked through the steps of creating a simple Spring Boot application that uses Spring WebSockets to communicate between the client and server. With the knowledge gained in this tutorial, developers can start exploring the possibilities of real-time communication in their own web applications.