
Install Webmin on AWS EC2 server
This tutorial shows how to install Webmin on AWS EC2 server.
Webmin is web-based management interface for system administration of *nix systems. It allows remote management of your system without having to manually modify the configuration files. It lets you install packages like LAMP stack, mail servers, wordpress etc. and setup & configure – firewalls, DNS, FTP servers, users, file sharing etc. all through a remote web interface. It is a must have tool for system and web administrators.
Below are the steps to install Webmin on AWS EC2 server.
Step 1: Download Webmin
Get the latest Webmin package from the download site using the following command.
|
1 2 |
wget http://www.webmin.com/download/deb/webmin-current.deb |
Step 2: Update apt-get
Update the apt-get package index files so that it fetches the latest information on new and updated packages. This step is very important.
|
1 2 |
sudo apt-get update |
Step 3: Install dependencies
Install the packages required by Webmin using the following command.
|
1 2 |
sudo apt-get install perl libnet-ssleay-perl openssl libauthen-pam-perl libpam-runtime libio-pty-perl apt-show-versions python |
Step 4: Install Webmin
|
1 2 |
sudo dpkg --install webmin_1.770_all.deb |
On successful installation, the output would look similar to the output shown below. Note the Webmin web interface url. The IP in the url is the internal IP. You need to replace it with your EC2 server’s public domain name/IP to access it from outside network/internet.
Output
|
1 2 3 4 5 6 7 8 9 10 |
Selecting previously unselected package webmin. (Reading database ... 83155 files and directories currently installed.) Preparing to unpack webmin_1.770_all.deb ... Unpacking webmin (1.770) ... Setting up webmin (1.770) ... Webmin install complete. You can now login to https://ip-XXX-XX-XX-XXX:10000/ as root with your root password, or as any user who can use sudo to run commands as root. Processing triggers for ureadahead (0.100.0-16) ... |
Step 5: Fix install errors
If you encounter any errors during installation, you can recover and fix the broken dependencies with the following command.
|
1 2 |
sudo apt-get --fix-broken install |
Step 6: Create Webmin user
EC2 ssh users require an ssh key to login and do not have a password hence, you cannot login into webmin with the root user. You need to create a new sudo user for logging-in into Webmin console. Use the following commands to create a sudo user called webmin. Use a STRONG password for the webmin user because if this interface is compromised then the entire server would be compromised.
|
1 2 3 |
sudo useradd -g sudo webmin sudo passwd webmin |
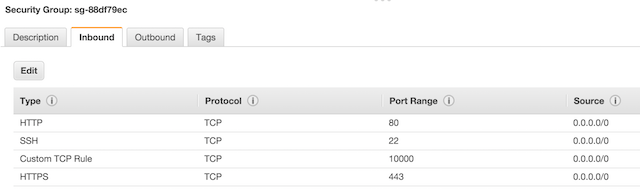
Step 6: Open port
Edit your AWS security group and add a custom TCP rule to allow traffic on the webmin port as shown in the screenshot below. The default Webmin port is 10000.
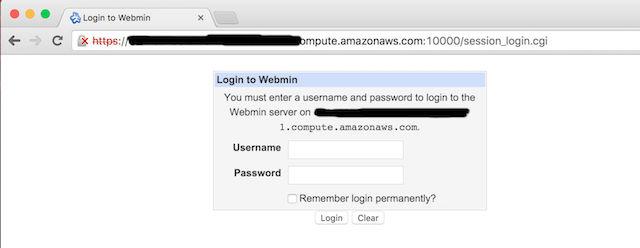
Step 7: You are Done!
You can now access the Webmin UI from the internet. The Webmin login page would like below. Log in using the user created in step 6 and start exploring!

Does the tutorial still work after more than 6 years?